Use this process for making Chocolate Stripes on Chocolate Covered Strawberries or any other chocolate treat. I’ll show you my easy process of making these fancy chocolate stripes for your dessert.

How to Make Chocolate Stripes
I just recently made 900 Chocolate Covered Coconut Bon-Bons with beautiful contrasting chocolate stripes. In that process, I have had a lot of practice getting to know the art of making those fancy chocolate lines on my candies. Along the way, I came up with a couple of tricks that I would love to share with you.
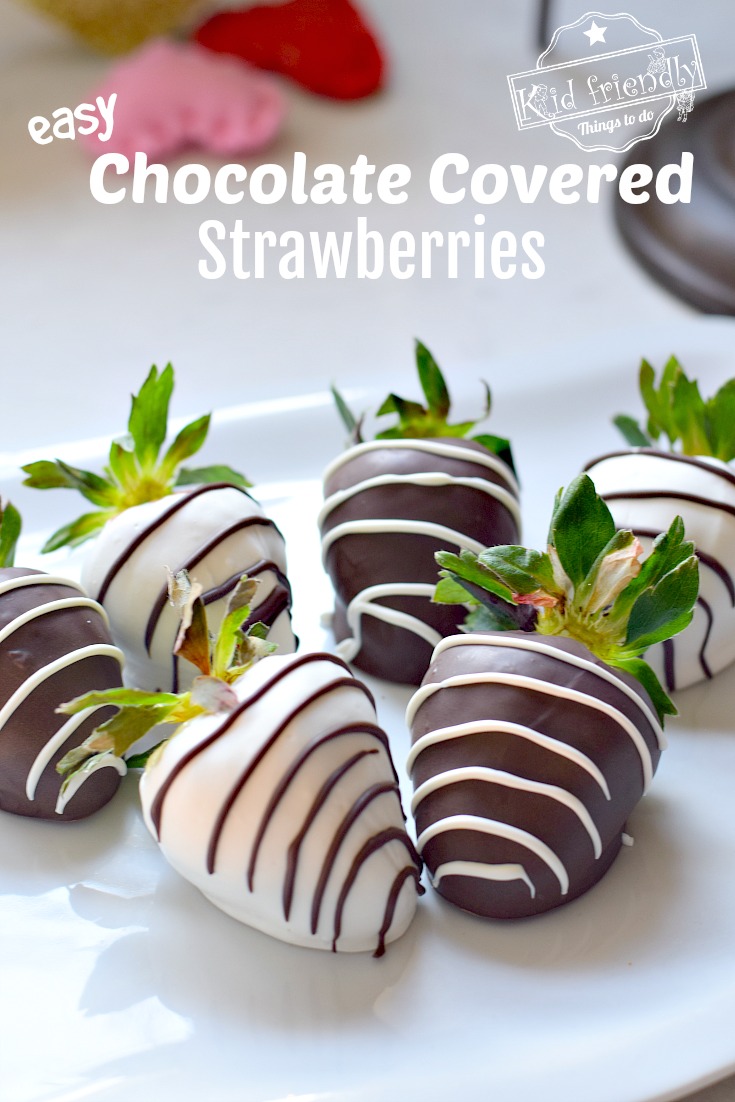
This method is perfect for any kind of fancy dessert. Like these Chocolate Covered Strawberries.
Are you looking for fun ways to decorate chocolate treats? Try some of my other posts, like:
Are you ready to make chocolate stripes? Let’s make sure you have everything you need…
You’ll Need:
- Chocolate Melts – a contrasting color to your dipped chocolate color
- A Zip-Tight Baggie
- Scissors
- Oven mitts
- A pizza pan, or thin baking pan – like a cookie sheet
- A pot of water, steaming on the stove
- Dipped candies, dipped pretzels, or another fun treat
Instructions:
- Melt your chocolate melts using the instructions on the back of the chocolate melt bag
- You may need to fold your zip-tight bag over, to get closer to the bottom of the bag
- Pour the melted chocolate into the plastic bag
- Squeeze the air out of the bag, and zip it shut

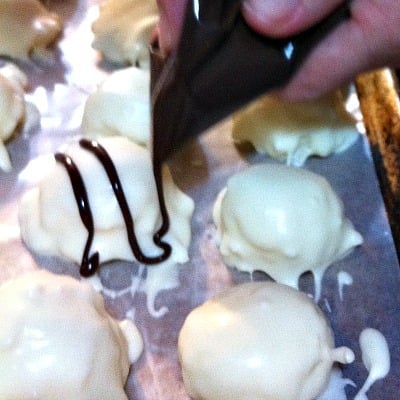
- Carefully, snip a teeny-tiny, corner of the bottom of the chocolate bag
- Using gentle pressure, squeeze the chocolate over the treats, going bag and forth, making a curvy zig-zag look
- Use a few practice candies, until you are confident in your zig-zag abilities
- If you are doing several, your chocolate may cool off, get thick, and harden
- I found that the nice thin hot chocolate produced the best, more controlled lines for me
- To keep the chocolate warm in my bag – this is what I did:

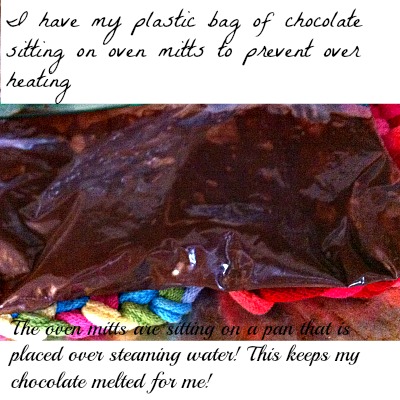
- You don’t want to place your plastic bag in the microwave. It’s not good for you, and the plastic will melt
- Place the baggie, over the mitts that are warming on the stove. The warm mitts will keep your chocolate at a good temperature, and ready to use over, and over
- If you run out of chocolate, repeat the steps above
- Have fun with it
~Melissa – KidFriendlyThingsToDo.com