Go Back
paper plate angel
Print
5 from 1 vote

A Beautiful Paper Plate Angel

Author: Melissa Haines

Materials

  • White paper plate one with ruffles on the edges
  • Aluminum foil Make two accordion folded-up strips - about 2 inches long by 1/4 in. wide
  • 2 Google eyes
  • 2 Little pink dots You can use a hole puncher to punch out dots from pink paper or use small pink buttons for the rosy cheeks
  • White Paper for the face I used thick paper like cardstock.
  • Doll hair You can substitute yarn or raffia if you can't find doll hair
  • ½ inch pipe cleaner for the mouth pink or red
  • Low-temperature glue gun Or - strong tacky glue (Fabri-Tac is a nice tacky glue that dries quickly)Scotch tape

Instructions

  • Cut the plate in half.
  • With one half, make a cone shape and glue it
  • Cut the other half of your plate into two halves - this makes the wings for your angel.
  • Cut a face out of white paper. I added a small extension for the neck.
  • Let the kids decorate their angel's faces with your supplies of Google Eyes, pink dots, pipe cleaner, and optional markers.
  • Add hair to the face and glue it to secure.
  • Glue a toothpick to the back of the head so it extends downward
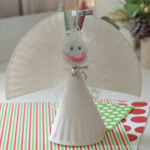
  • Assemble the angel by, inserting the toothpick into the top of the cone so the head is resting on top.
  • Glue it to secure it in place.
  • Optional: Tie a bow made out of ribbon to the neck of the angel
  • Attach the angel's wings to the back of the cone
  • Use one aluminum strip to make a halo for the angel by shaping it into a circle.
  • Attach the other accordion folded strip to the halo and glue it to the back of the angel's head

Notes

This post may contain affiliate links. As an Amazon Associate, I earn a small commission from qualifying purchases. See my disclosure policy to read more. Adult supervision is required for each step of activities, recipes, crafts, and games with children. Small parts are a choking hazard. Sharp objects can cause injury.