Build a Snowman Sensory Bag (Easy Winter Activity for Kids)
Build a snowman sensory bag with simple supplies for a fun, mess-free winter sensory activity that boosts fine motor skills.
Yield: 1 sensory bag
Cost: $5
Materials
- Clear zip-top bag (quart or gallon size)
- Black permanent marker (Sharpie)
- Clear hair gel or clear gel (Dollar Tree works great)
- Snowflake glitter or white/silver glitter
- 5 small buttons - I used various sizes
- 2 small sticks (collected from outside) - I found some from a Willow tree that weren't too jagged and didn't make me worry they would poke through the bag with extended play.
- Foam carrot nose (or orange foam triangle)
- Tape (optional but recommended) strong tape like Duck tap for sealing the bag
- Baking sheet or tray (for play surface)
Instructions
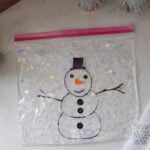
- Draw the Snowman-On the outside of a clear zip-top bag, use a permanent marker to draw a snowman’s body, head, and hat. Do not include details like eyes, arms, or buttons on the belly.
- Add Snowman Pieces-Place 5 buttons, 2 small sticks, and a foam carrot nose into the bag.
- Fill with Gel-Squeeze clear gel into the bag, filling it about halfway.
- Add the Snow-Sprinkle snowflake glitter on top of the gel to create a snowy effect.
- Remove Air & Seal-Gently press out as much air as possible before sealing the bag tightly.
- Extra Protection (Recommended)-Place the sealed bag inside a second zip-top bag to help prevent leaks.
- Secure for Kids-Tape across the top of the bag so little hands can’t open it.
- Play & Explore-Let kids move the pieces around to build the snowman and swirl the glitter to make it “snow” inside the bag.