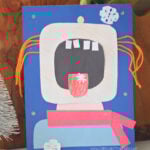
Catching Snowflakes Craft (Free Printable!)
Easy winter craft for kids using paper and glue! Catching snowflakes activity with a printable template.
Yield: 1 craft
Cost: $5
Materials
- Catching Snowflakes printable
- Cardstock or construction paper (I used dark blue for the sky)
- White Cardstock for printing, teeth, and snowflakes Keep scraps after cutting printables for teeth and snowflakes
- Glitter paper or material for a scarf
- Crayons or markers
- Scissors
- Glue stick
Instructions
- Print Have kids cut out the template pieces: head, neck, mouth, tongue, nose, and shoulders.
- Color the piecesLet kids color everything before assembling. This is a great time to personalize skin tones, clothing colors, and facial details.
- Cut: Cut the pieces out and get ready to assemble
- Assembling: Glue the pieces onto a sheet of cardstock. I used dark blue for the background to represent the winter sky and provide a contrast to the snowflakes.
- Head and Hair: Glue the head. Lift the head's top corners and glue yarn pieces underneath, letting them hang off to the side. Lift the head's top corners and glue yarn pieces underneath, letting them hang off to the side.
- Body: Glue the neck and shoulders in place.
- Tongue and Teeth: Add the mouth and tongue, making sure the tongue is ready to “catch” snowflakes.Cut some teeth from leftover scrap paper and glue those onto the mouth.
- Scarf Detail: To finish off the winter look, I added a sparkly scarf made with bright-pink glitter paper. Simply cut one rectangle slightly longer than the neck for the scarf wrap, then cut two smaller rectangles to glue underneath as the hanging scarf pieces.
- Snowflakes: Glue glitter or paper snowflakes onto the tongue, clothes, face, and sky.