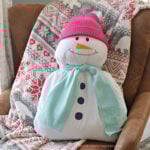
DIY No-Sew Snowman Pillow Buddy Craft
DIY no-sew snowman pillow buddy craft using a pillow, fabric, and glue. A cozy winter craft idea for kids and classrooms.
Yield: 1 pillow buddy
Cost: $10
Materials
- 1 Polyester pillow (standard or small works great)
- Fleece fabric - cut into a long strip
- 1 Winter hat (kid-sized beanie or knit hat)
- Fabric for the nose (orange cotton, felt, or fleece)
- Fabric markers (black and optional colors)
- Strong craft glue - I use Beacon 3-in-1 Fabric glue would also be a good option
- Binder clips (strong ones work best)
- Scissors
Instructions
- Create the HeadStart by wrapping and tying the fleece scarf around the pillow about one-third of the way down. Pull it snug—this forms the snowman’s “neck” and gives you a clear head and body shape.
- Shape the Snowman Top-At the top of the pillow, gently pull the two top corners toward each other. Add a generous amount of strong craft glue where the corners meet, then clip them together with binder clips.Pro tip: Leave the clips on until the glue is fully dry to keep everything secure.
- Add the Hat- While the glue dries, continue crafting. Slide the winter hat onto the pillow, covering the clipped area. This hides the construction and instantly brings the snowman to life.
- Make the Nose-Cut a small triangle or cone shape from orange fabric. Glue it onto the center of the face area and let it dry completely.
- Draw the Details-Use fabric markers to draw the snowman’s face—eyes, smile, and buttons down the body. You can keep it classic or add your own personality with eyelashes, rosy cheeks, or fun expressions.