Sugar Cone Christmas Tree Craft (Perfect for Kids!)
A fun and festive Sugar Cone Christmas Tree Craft with kids
Yield: 1 tree
Cost: $5
Equipment
- 1 Sharp pointed object like an Awl for an adult to use
- spreading utensils
- clear plastic cups with lids 16 oz. or larger
Materials
- 1 sugar cone
- green frosting
- assorted candies suggestions include: Pull-N-Peel red licrorice, M&Ms, mini M&Ms, assorted Christmas sprinkles
Instructions
Prep the Craft for the kids
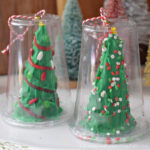
- Before the kids start decorating, you’ll want to do a little prep work. Using cookie icing, glue each sugar cone (point facing up) onto the inside of a cup lid. Let the glue dry and set up overnight — this will keep the cone stable while kids decorate.
- Next, poke a small hole in the bottom of each clear plastic cup. Insert a paper fastener through the hole, spread the prongs out, and tie a piece of Christmas twine or ribbon to the fastener for hanging later.
Decorate
- During your classroom party, family gathering, or holiday crafting session, give each child a “tree base” (the lid and cone combo). Let them frost the cone with green frosting using a small spatula or craft stick, then decorate with candy, sprinkles, and licorice pieces.
- A gold star sprinkle on top makes the perfect finishing touch.
Finish Up
- Once the trees are decorated, place the clear cup over the frosted cone and glue the rim of the cup to the lid. I like to use tacky glue because it grabs quickly but still allows a little time to adjust before fully drying (about 30 minutes).