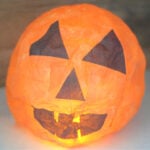
Tissue Paper Halloween Lanterns
Easy to make tissue paper lanterns for a Halloween craft
Yield: 1 lantern
Cost: $5
Equipment
- paintbrush
- Scissors
Materials
- Glue like Elmers Glue
- Water
- Assorted tissue paper cut into squares for layering- colors will depend on your intended design.
- More assorted tissue paper colors are cut into shapes for eyes, nose, mouth, etc... i.e., I cut dark colors into triangles for my Jack-O-Lantern lights.
- Latex Balloons that are blown up to the size you desire and secured with a knot
- A large Solo Cup to hold your creation while you work and for drying
- An LED light I found mine at the Dollar Tree - It works perfectly
Instructions
- Make a glue paste with an equal amount of both glue and water
- Before you begin, you must put something on the bottom of the cup to give it some weight. I used water, but you can use rocks or marbles.
- Set the bottom of the balloon onto the cup - this will help hold your balloon for you.
- Paint the glue paste onto a section of the balloon
- Apply the tissue paper to the wet paste - If it is not entirely sticking to the balloon surface, dab a little bit of paste over the tissue paper
- The tissue paper should be wet through
- Cover the entire balloon in this way with two layers of tissue paper
- Add your detail pieces (eyes, mouth, etc...) with the contrasting colors of tissue paper
- Let the balloons dry for about 24 hours
- When they are completely dry, use your scissors to cut the tip-off of the balloon. The balloon will deflate, and pull away from the paper
- *Your paper-mache might start to sink in. Don't worry - You can push it gently back into the balloon shape it once was
- Cut a level and small circular area out of the bottom of your project. This will help it stand up, and gives you a place to set your light
- Now you can pull the balloon out and if needed, reshape your paper mache by gently pushing the shape out
- When you're ready, place your paper-mache project over your LED light
- That's it! Enjoy your spooky lights