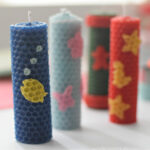
Making Rolled Beeswax Candles with Kids
Easy rolled candles that you can make for any holiday or occasion
Yield: 1
Cost: $15
Equipment
- hair dryer optional
- wax paper optional
Materials
- beeswax sheets I used 4x12 inch sheets
- wick
- mini cookie cutters
Instructions
- Cut the wick so it is about one inch longer than the shorter length of the beeswax candle sheet.
- Optional: Place wax paper onto your work surface
- Set the beeswax sheet onto the wax paper and place the wick so it is lying across the edge of the short side
- If you are working with kids, a little tip is to make sure the wick is extending out both edges so that if they roll it up and one side looks prettier than the other, you'll have options on choosing which will be the top of your candle.
- Start rolling the beeswax up and around the wick. You might notice that the first few rolls will cause the candle to break apart. Just push the broken pieces even with the rest of the candle and keep rolling. It will start to even out and roll easier.
- Once you get to the end, use a hair dryer to slightly warm the last little bit. Push the warmed edge onto the candle and gently press down to seal it.
Decorating
- Use your mini cutters to punch fun shapes out of contrasting beeswax colors
- You may need to use a tool like the eraser side of a pencil to push the shape out
- You can use other tools like straws to make little bubbles or circles and scissors to cut out more shapes to use
- To make the shapes stick better, I used a hair dryer to warm them up so they would mold easier.
Notes
An adult should operate the hair dryer.
If you want to do the craft without the hair dryer so the kids can do it by themselves, then that is fine. The warming of the beeswax forms a tighter molded seal.