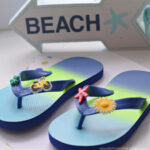
DIY Flip-Flop Craft with Kids
Embellish flip-flops for a fun custom summer shoe
Yield: 1
Cost: $10
Equipment
- cutting tool I used a curved cutting tool from my local hardwar store. They resemble gardening shears
Materials
- 1 pair flip-flops
- rubber shoe charms
- strong waterproof glue Specifically, I used JB Weld with a UV light that cures the glue instantly. It is holding up very well. I can tug on the charms and they stay put
Instructions
- Kids can pick out some fun rubber charms for the flip-flops. I picked two per flip-flop. one for each side
- Using the cutting tool, cut the bottom plastic piece off of the charm so that it can be glued onto the flip-flop
- Add glue to the back of the charm and place it where you all think it should go
- Kids can use the binders to help secure the charms in place as they dry
- You may need to glue a second time to get other parts of the charm secured to the flip-flop
- Again, use the binders to hold the charms in place as the glue dries securely
Notes
The glue is strong in odor and in strength. The cutting tool is sharp. An adult should do the gluing and cutting portion of the flip-flop craft.
Don't forget to protect your work surface from any stray glue drips and also the flip-flops.