How to Make Colorful Corn Husk Dolls
Colorful and beautiful corn husk dolls
Yield: 1 doll
Cost: $5
Equipment
- 3 or more deep dish baking dishes or containers
- Scissors
Materials
- 8 pieces corn husks
- Fabric Dye
- water
Instructions
- Add warm water to large containers or pans
- Add dye to each container and mix in
- Put the husks in the pool of water dye to soak for at least an hour, if you can leave them in the dye for a day, the color will be more brilliant.
- Once your husks have soaked, pick 8 husks to make your doll.
- Squeeze out the excess water, and place them on a protected work surface so dye does not ruin your work surface
- Stack 6 of your husks - matching the ends up with all of the pointed ends to one side and the wide straight ends on the other. Use your best and widest pieces to stack.
Color Order
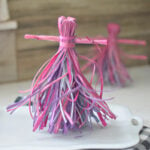
- Alternate colors, except for the two in the middle. Those should be the same color as they will be the head and arms of the doll. My middle pieces were pink, as you can see.
- With one of your remaining two husks (your longest one) - tear one of them into thin strips - which will act as your ribbons to tie the arms and clothes
- Use one of your thin strips to tie a knot around your stacked 6 husks together, about an one-half inch from the top. The top is the pointed part of the husks-narrow end. Make sure it is a tight fit.
- Pull the corn husks apart in the center and fold them over the tied end
- About one inch from the top of the folded pieces, use another strip to tie around it - making sure that is is a tight fit. This will form the head.
Arms
- Take your last corn husk that is sitting on the side, and roll it up to form a long tube. Tie both ends with your thin strips of husk.
- Slide this arm/tube into the split of the dress, (the middle part of the stack of 6) sliding it all the way up to the head.
- Tie another strip under the arms. to keep them in place. You can adjust the arms by sliding them to the center and trim them if necessary.
- To make the colorful and full corn dress, pull the corn husks into tiny strips from the bottom of the dress to the waist. The more strips you make, the fuller and more vibrant the dress will be.
- Trim anything that needs it. If they are wet, let them dry for a day and them enjoy your new doll
Boy Dolls
- Instead of tearing strips from the dress, split the corn husks in half to make two legs. Use the corn strips to tie each leg.