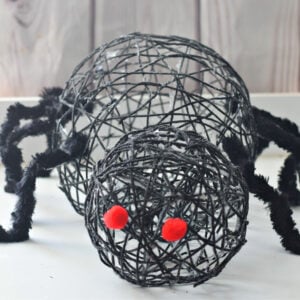
How to Make a Giant Spooky Spider out of Yarn
An easy to make giant spider craft for Halloween
Yield: 1 spider
Cost: $10
Equipment
- Something to set the balloon in to dry like kitchen containers, bowls, or buckets
- A bowl for the glue paste
- Fork optional
Materials
- 1 package Black yarn cut into strips that will fit the length of your balloons
- 2 Balloons
- Glue don't use washable or school get strong glue like Tacky Glue for Crafts
- Water
- 6 feet Giant Chenille Pipe Cleaner Black - for legs
- 2 large red pom-poms for the eyes
Instructions
- Blow one balloon up to a very large size—as far as you can go without popping it—this will be the body of the spider. Mine is about one foot from the tied part of the balloon to the bottom.the yarn.
- Blow one balloon up to a small size, holding it up to the large one so it looks like the size a head should be for the spider. Mine is about six inches from the tied part of the balloon to the bottom.
- Squeeze some glue into a bowl. Pour in enough water to make a paste with the glue. You want the glue a little bit thinner so it is easier to work with. You'll probably have a ratio of 70:30 glue to water.
- Dip a piece of yarn into the glue paste, and swirl it around to soak it
- You can run the yarn through a fork that you hold on the edge of your bowl, or you can use your fingers to squeeze the excess glue out of the yarn. This will get excess glue off of the yarn
- Using the balloon's tied tip as a good starting point, wrap the yarn around the tip to secure it in place.
- Then, pull the yarn down one side of the balloon and up the other—back to the tip again—and wrap it to secure it.
- Make more vertical strips around the balloon to use as a base
- Continue doing that all over the balloon and place yarn sideways and diagonally, too—you'll end up glued yarn going every which way
- Do the same for your other balloon.You'll want to let them dry overnight, resting them in the bowls or cups you have ready.
- The next day, add second and third layers, adding more of a webbed look each time. Keep going until you're satisfied with the amount of yarn covering the balloons.
- Let the yarn dry thoroughly - give them a couple of days - I know that's hard, but you want them to be stiff.
- Finally, pop the balloons and pull out any remaining balloons - clean the extra glue pieces off of
Assembling
- Facing yarn balls tip to tip (the narrow ends facing each other) - secure them together with a wire strip or small black pipe cleaner
- Add the red pom-poms for the eyes with hot glue.
- Cut the fur chenille into eight equal strips. Add the large bendy strips to the body - bending them to resemble the legs of a spider. If needed, use a low temp. glue gun to secure them to the sides