Iced Almond Thumbprint Cookies for Springtime
This post may contain affiliate links – please read my disclosure statement.
These colorful Cookies for Springtime are soft, buttery, and delicious. They are easy to make and fun to decorate with the kids, perfect for your Easter celebration.

Almond Thumbprint Cookies for Springtime

I usually make these cookies at Christmastime. They are so easy to make, that I don’t mind rolling out a few batches.

While they are beautiful in red and green, I love them so much better in pastel colors.
If you are looking for springtime cookie ideas, try some of my other fun recipes – like:
- Bunny Shaped Cookies – Easy to make
- Chocolate Covered Pretzel Bites for spring
- Rainbow Chocolate Covered Strawberries

Do you put icing on cookies before or after baking?
- You should put icing on cookies after baking and cookies have completely cooled
How do I keep my Thumbprint Cookies from spreading?
- Chill the dough. Warm batter will spread more
- Don’t over beat the sugar and butter step. Just mix until well blended
- Use parchment paper or silicone sheets in place of greasing the pan

Iced Almond Thumbprint Cookies for Springtime Recipe Ingredients:
Ready to bake? Make sure you have all of the ingredients handy…
- margarine melted – melted butter leads to chewier cookies
- sugar
- vanilla extract – or almond extract – I used only to use vanilla, but now I prefer the taste of almond in these cookies. They are almond thumbprint cookies, after all
- salt – this sharpens the buttery flavor
- flour – all-purpose
- optional – finely chopped nuts (almonds) – I love the nutty flavor that the almonds lend to the cookie, but the kids don’t like the texture. This is completely optional Filling
Filling
powdered sugar – this thickens and sweets your icing
almond extract – the best flavor for this icing
water – be sparing. Add less water at first and more to thin the batter, if necessary
Gel food coloring – this is just to not oversaturate the icing with more liquid. If you only have liquid, then just use less water to thin the icing
Almond Thumbprint Cookies
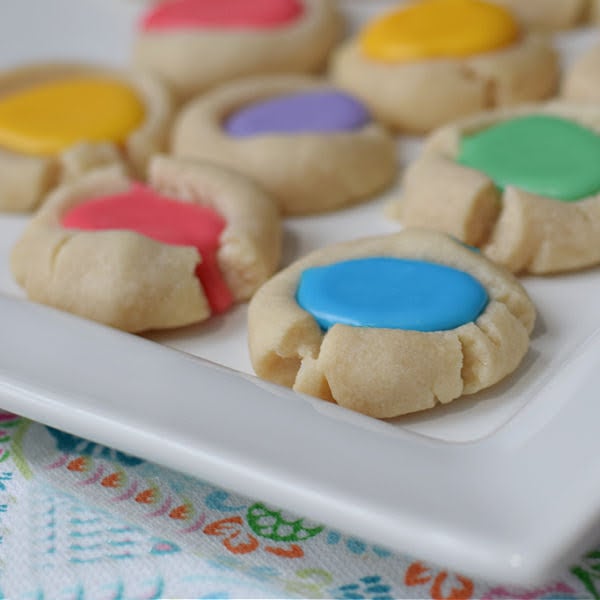
Iced Almond Thumbprint Cookies for Springtime
Ingredients
- 1 cup margarine melted
- ¼ cup sugar
- 1 tsp. almond extract
- ¼ tsp. salt
- 2 tsp. milk -I used 2%
- 2 cups flour all-purpose
- 1 cup chopped almonds optional
Filling – for each color
- 1 cup powdered sugar
- 1 tsp. almond extract
- 2 – 3 Tbsp. water
- 2-3 drops Gel food coloring I used neon colors *you can use liquid food coloring but you'll want to use less water so your icing isn't too runny
Instructions
- Preheat the oven to 350 degrees
- Melt the butter until it is warm enough to dissolve the sugar (I usually microwave the 1 lb. for about 30 seconds) If it is only partially melted, that’s fine. It will probably have a warm, and creamy texture)
- In a large bowl mix melted margarine or unsalted butter and sugar together until sugar is dissolved
- Add extract and milk – stir in
- In a small bowl mix the salt, flour, and *optional nuts
- Add the dry ingredients to the wet and mix together
- Roll into balls about 1 inch in diameter
- Push the center down with your thumb or the back of a Tbsp. measuring spoon that has been greased
- Bake at 350 degrees for about 8-10 minutes
- While that is baking – stir the ingredients for the icing together adding the water 1 Tbsp. at a time, and stopping when the icing is a nice smooth consistency but not too runny
- If it gets too runny…just add a little more powdered sugar
- After the cookies are done and cooled – add a spoonful of icing to each center
Notes
Nutrition

